Google Search, Images, and Maps account for 92.96% of global traffic, therefore ranking on Google is critical for any SEO plan.
However, if you want to be successful with SEO, you will need the right tools to track your progress using KPIs such as click-through rate (CTR), impressions, and page visits.
If you’re new to the SEO world, you probably won’t have the money for fancy systems with extensive reporting capabilities.
But if you want to rank on Google, you have to start someplace and commit to something.
A great starting point is utilizing Google’s free tools.
Google Search Console (GSC) is the updated version of what was previously called Google Webmaster Tools.
GSC is now accessible on mobile devices. It gathers 16 months’ worth of data, providing in-depth page analytics, enhanced tracking methods, and updated reports. It’s essential for website owners looking to increase their search performance.
Keep reading to discover how to make the most of Google Search Console (GSC) to optimize your website for Google.
What Is Google Search Console Good For?
Google Search Console (GSC) is a powerful tool for boosting your landing pages’ Google rankings.
Wondering why?
It’s because GSC provides insights into how Google explores your page. Essentially, you can see your web pages from Google’s perspective, like looking through the eyes of a GoogleBot. Consequently, you can identify and fix any crawl errors or indexing glitches.
This ensures that all your web pages get indexed and show up on Google’s search engine results pages (SERPs).
The worst scenario is investing lots of time and money optimizing your site for Google, only to find it isn’t indexed due to an error. This means all your SEO efforts will be wasted unless you address the issue.
If you don’t use GSC, you might not even notice that your web pages aren’t appearing in search results. That’s why GSC is such an important tool for website owners to use.
GSC is also useful for:
- Which search queries you show up for
- How often users click through to your site (click-through rate or CTR)
- Viewing backlinks
- Troubleshooting mobile usability
- Monitoring your website’s core web vitals
- Evaluating the search performance of new content
- AMP
Differentiating GSC from GA
GSC also pairs up with another one of Google’s free tools, Google Analytics (GA). Initially, it might seem like both tools provide similar data, but there are notable differences.
Google Analytics primarily offers insights into your website’s visitors. For example, you’ll get detailed information about the number of visitors, their sources of arrival, and how much time they spend on your site. You can pinpoint the geographical locations from which most of your users come.
On the other hand, Google Search Console focuses on presenting your site’s performance from Google’s perspective. You can check for any indexing or crawling issues and see which keywords your site ranks for in the search engine results pages (SERPs).
The great thing is, Google Search Console easily connects with Google Analytics, giving you access to all your data in one place. This means you can analyze both your user data and how Google sees your website, all in one convenient spot.
Other key features of GSC
Google Search Console is a handy tool for enhancing your website’s visibility. It shows how your pages look in Google’s search results and offers valuable insights into user experience.
You’ll also get a glimpse of how your content appears in rich snippets and cards, which is crucial if you’re aiming for featured snippets in your blogs.
To tackle indexing issues, focus on optimizing your title tags, meta descriptions, and headers. Additionally, tidy up any orphan pages (those without inbound links) and ensure your internal linking makes sense.
Remember, Search Console isn’t just for site admins.
Your SEO experts and content marketers should also know how to use it to track and improve inbound traffic. Plus, your website developers can utilize it to handle markup problems efficiently (we’ll discuss adding team members later).
How Do I Set Up Google Search Console?
To begin, make sure you’ve got Google Search Console installed on your browser. It’s best to use the latest version of Chrome, Firefox, Safari, or Edge, and be sure to enable cookies and JavaScript.
If you’re already using Google Analytics, chances are you already have a Google account set up. But if not, no worries – you’ll just need to create one before you dive into GSC.
Once you’re all set with that, it’s time to sign up for Google Search Console and verify that you own the website in question.
But why is ownership verification necessary?
Well, here’s the deal: Google Search Console provides valuable insights into your website’s performance and helps Google understand how to crawl it effectively. To access this information, you need to confirm that you’re the rightful owner of the domain.
Similar to getting verified as a business account on Twitter or Instagram, you’ll need to confirm that you’re authorized to access some exclusive details for your website.
Here’s how to add a new website in Google Search Console (GSC):
- Log in to your Google account.
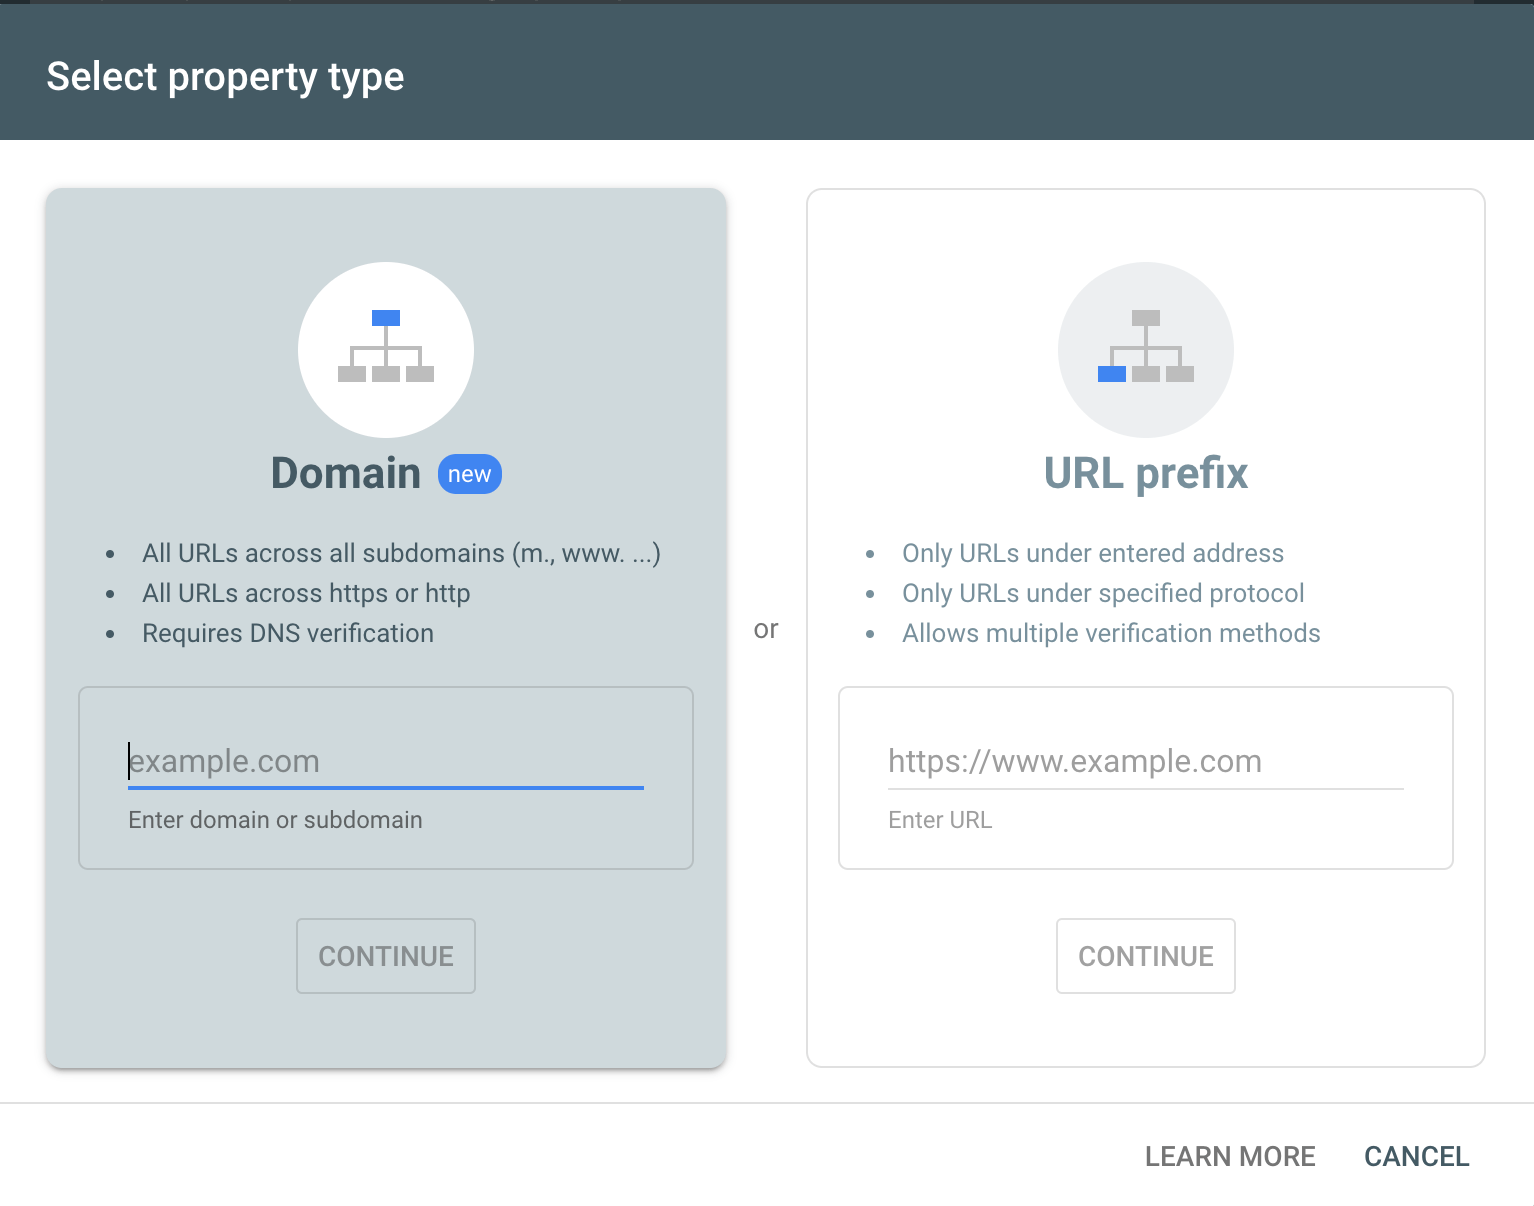
- Go to Webmaster Tools and click on ‘Add Property.’
- Choose ‘Website’ from the drop-down menu and enter your website’s URL. Make sure the URL shown in your web browser is correct.
- Click ‘Continue’ and choose a verification method (details below).
- Don’t forget to include all versions of your URL. This is crucial. Include ‘yourwebsite.com,’ ‘www.yourwebsite.com,’ ‘blog.yourwebsite.com,’ and any other URLs you have.
The last step is crucial. Make sure to include all versions of your domain so that Google doesn’t separate your organic traffic and backlinks based on the URL.
Set your preferred domain as the main version of your website. To do this, set up 301 redirects from any alternate domains to the one you’ve chosen.
Verifying site ownership in GSC
To authenticate the ownership of your website, you can use several techniques:
- HTML file: Simply place a verification HTML file at a specific spot on your website.
- Domain name: Log in to your domain registrar to confirm that your GSC website has a DNS TXT or CNAME record.
- HTML tags: Add a tag to the HTML code portion of a web page to verify your website.
- Google Analytics tracking code: If you have the ‘edit’ permission on GA, you can copy the tracking code that you use on your website.
- When using Google Tag Manager (GTM), just copy and paste the GTM container code onto your website. Make sure you have the necessary view, edit, and manage container-level permissions to complete this task.
When you sign up for Google Search Console, you’ll get automatic alerts whenever Google notices anything odd, like unusual markup or an unindexed page.
After accessing the dashboard, don’t expect to see data right away; it might take a few days to fully set up (keep this in mind if you’re working non-stop).
Adding Your Team With Search Console Users
Your team members will definitely need access to Google Search Console, and Google offers a variety of management options:
- Verified owner: The verified owner holds complete authority over all properties in GSC. They can add or remove people, access all data, and use any tool. Essentially, they’re the leader who calls the shots for the team.
- Delegated ownership: In GSC, there are two types of owners: verified and delegated. Verified owners can assign delegated ownership, granting nearly all privileges except for changing settings. A delegated owner, in turn, can assign this privilege to others.
- Full User: A full user can view most data and perform some actions. A typical example of a complete user is a member of your blogging team who wants to analyze blog performance.
- Restricted User: A restricted user can only read data and not take any actions. You can also limit the amount of data they can view, such as preventing them from viewing the index coverage report.
The person who sets up your website’s Google Search Console account becomes the verified owner right away and gets full control of the tool.
This owner can then add other authorized owners and users with full access or limited abilities. They can also create restricted users who can only see the property’s data.
Load Your Sitemap
A sitemap is like a guide for Google, showing which pages of your website it should look at.
Google says if your site is small (less than 100 pages), you can just give them the homepage link for indexing, and if all the pages are linked from there, Googlebot will take care of the rest.
If your website already has a clear internal linking structure, there’s no need to provide your sitemap to Google Search Console.
Uploading your sitemap is necessary only if:
- Your site is extensive. The bigger it is, the tougher it gets for Google to crawl smoothly. More pages mean more chances Google might miss updates or new content.
- Your site is brand new. With a fresh website, you probably have few or no backlinks yet. This makes it harder for Google to discover, so it’s wise to submit your sitemap.
- Some pages are orphaned. Are there any landing pages without inbound or backlinks? If yes, Google might miss them while crawling.
If your website meets any of these criteria, publishing your sitemap should be your next step. It’s better to be safe than sorry.
How Do I Get the Most Out of Google Search Console?
Thankfully, if you’re new to Google Search Console, you’re in luck with the latest version.
Trust us, this tool used to be much harder to grasp and navigate.
However, keep in mind that every website has its own SEO objectives, so let’s delve into each tab of the Console below.
Overview
The Search Console tool is probably the handiest feature for beginners. It gives you a quick look at all your important metrics and analytics. It’s perfect for checking things like your average position, click-through rate (CTR), and impressions.
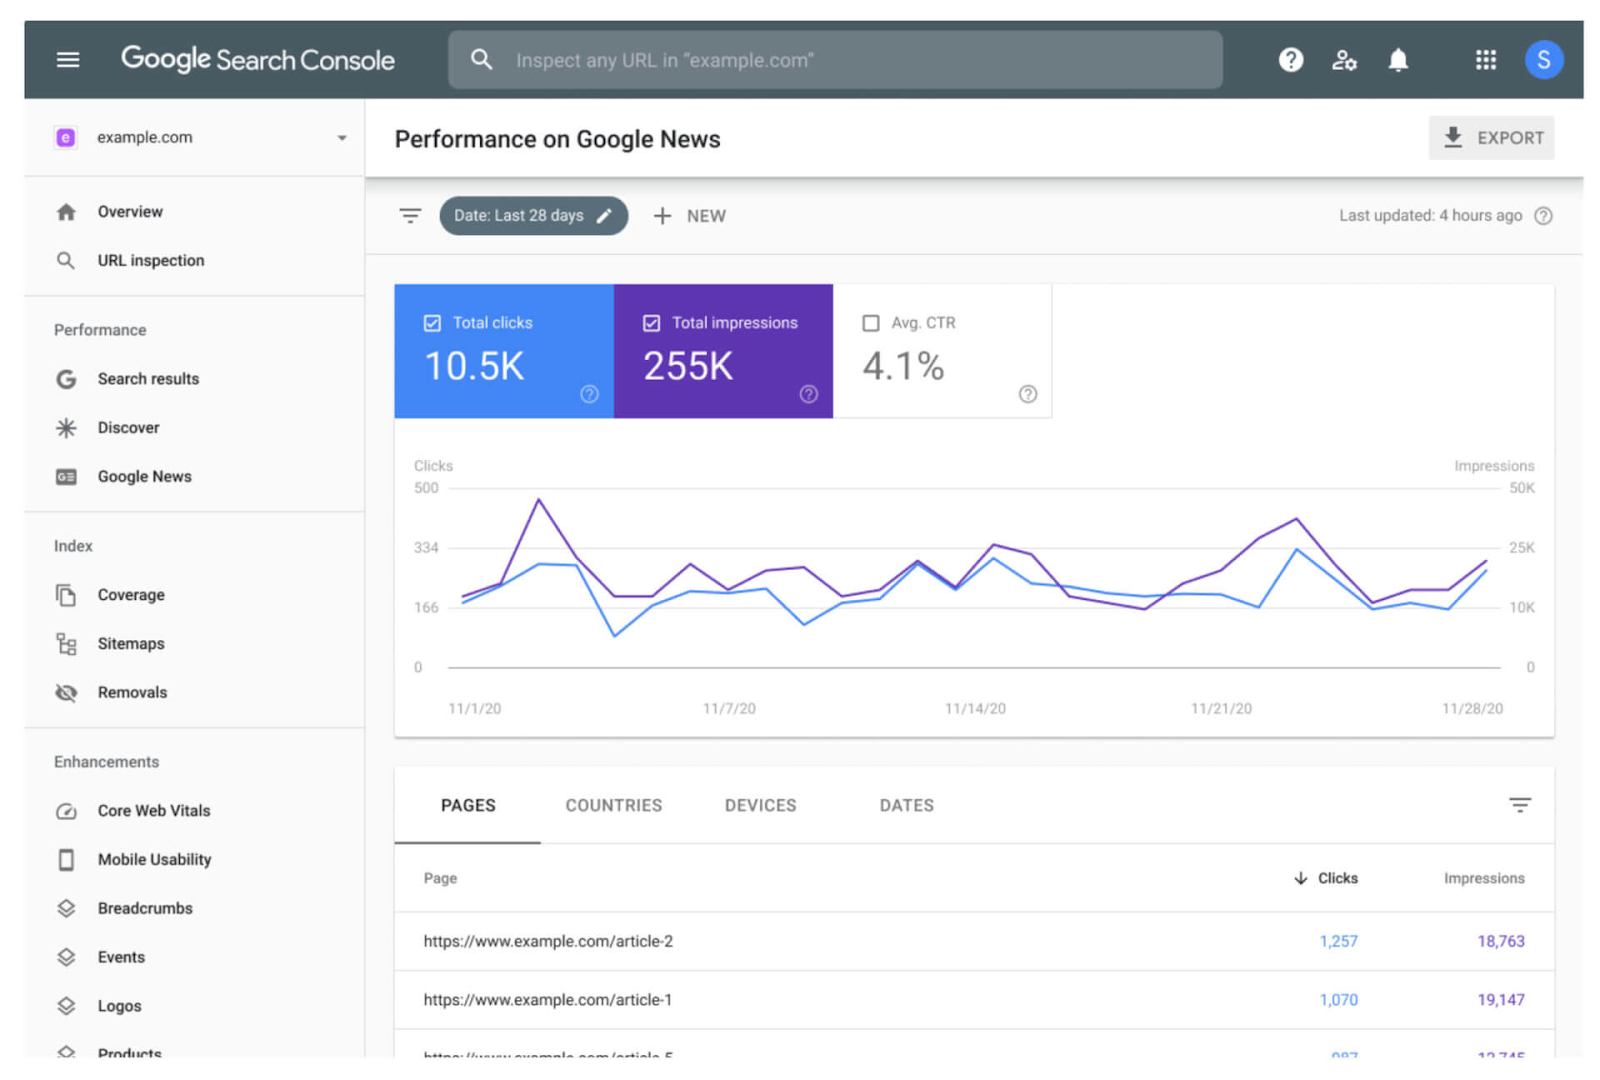
Performance
You can tailor the Performance report to display the data you’re interested in, similar to how you customize settings in Google Analytics. With Google Search Console, you have the flexibility to sort and refine results by queries, pages, countries, devices, search type, search appearance, and date.
In essence, this feature helps you track the sources of your organic site traffic, identify the queries most associated with your page, monitor click-through rates from the search engine results page (SERP) to particular pages, observe fluctuations in your search traffic over time, analyze searches by device, and much more.
URL Inspection Tool
You can just enter a URL from your website, and you’ll get metrics for that page. This feature was added during the big Google Search Console update, and it comes in handy when you’re looking to improve specific pages for search engine results.
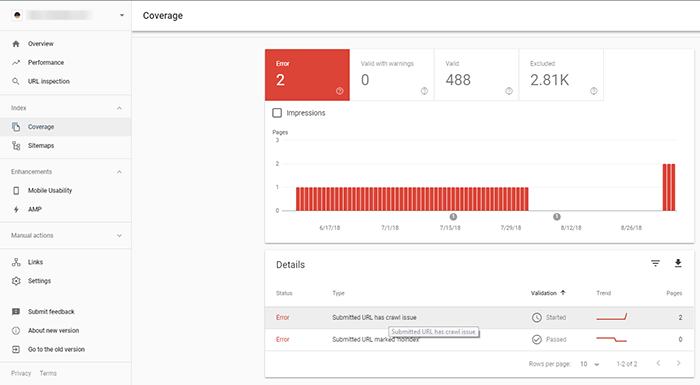
Index Coverage Report
Google Search Console helps you monitor all the pages indexed on your website, accessible right here.
You’ll get a comprehensive report showcasing URLs organized by index state.
These states encompass Error, Warning, Exclusion, and Valid, with each accompanied by an explanation. Although we won’t delve into every reason now, you can explore further details on Google Search Console.
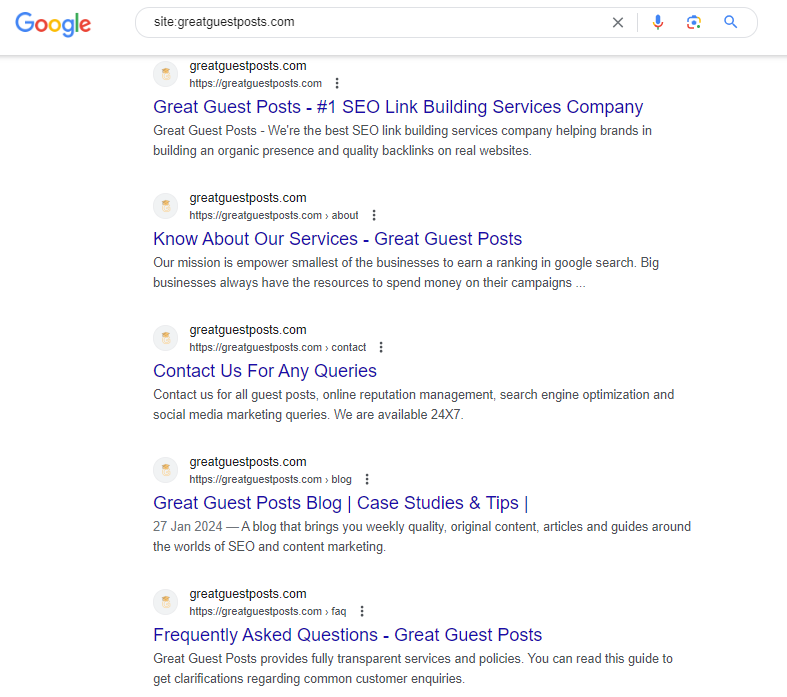
Pro tip: If your website has less than 500 pages, you might not need this report. Instead, try this quick trick: just search for your site on Google using “site:your_site” (put your homepage URL here), and you’ll see the pages Google knows about.
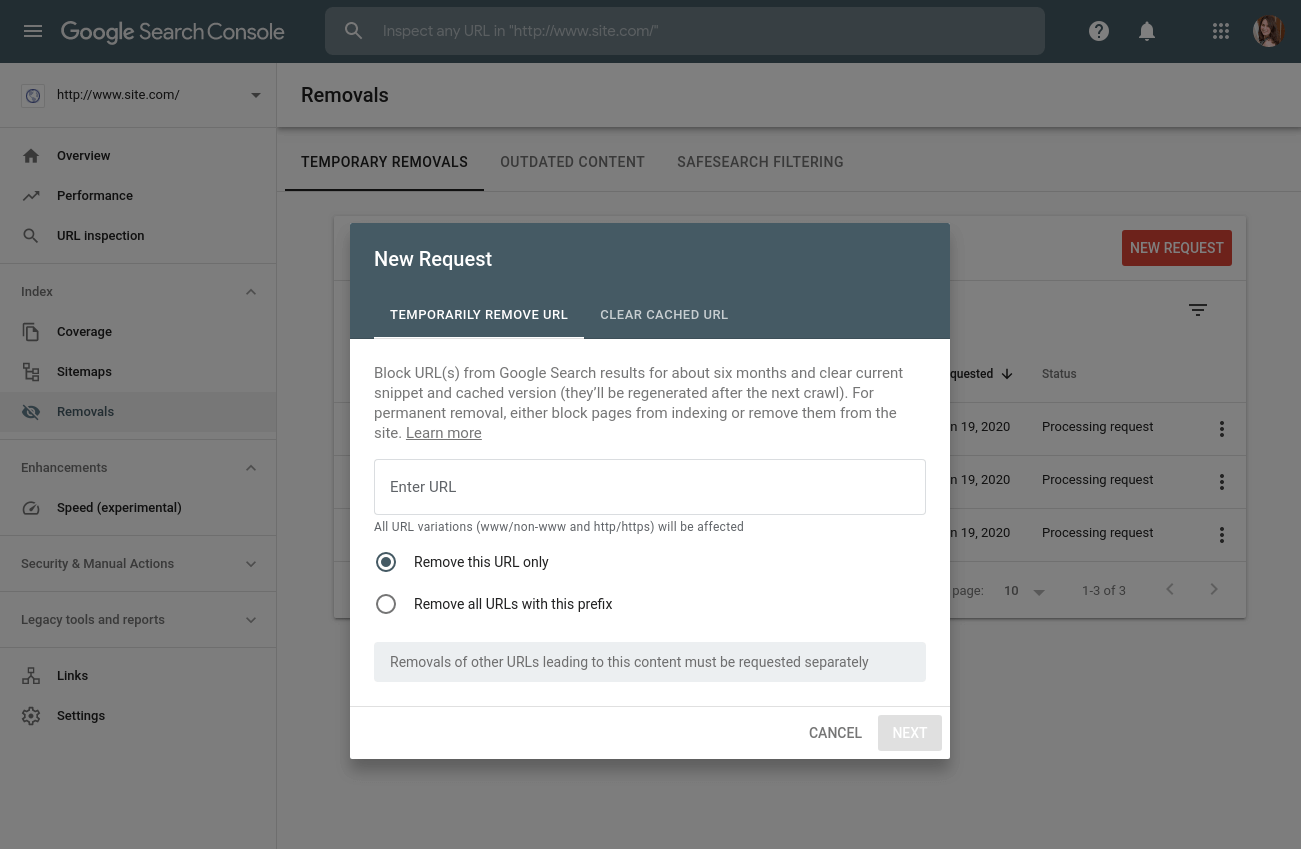
Removals
In this section of Search Console, you can temporarily take down your web pages from the search results and check content on your site that Google has flagged as “adult.”
Core Web Vitals
These are great new tools in Google Search Console. They help you fix issues like slow load times, low interaction, and instability, which can all lead to bad user experiences.
Google analyzes three essential online vitals using data from Chrome usage. These are LCP (longest contentful paint), FID (first input delay), and CLS (cumulative layout shift).
LCP measures the time it takes for your page to load once a user clicks on it. Slow loading times can negatively impact user experience and increase bounce rates.
FID measures how long it takes for a user to interact with your web page. For instance, it assesses the time it takes for a user to start entering their login credentials on a login page.
CLS measures how steady your website is when loading content. If it isn’t steady, links and page elements will move around while loading.
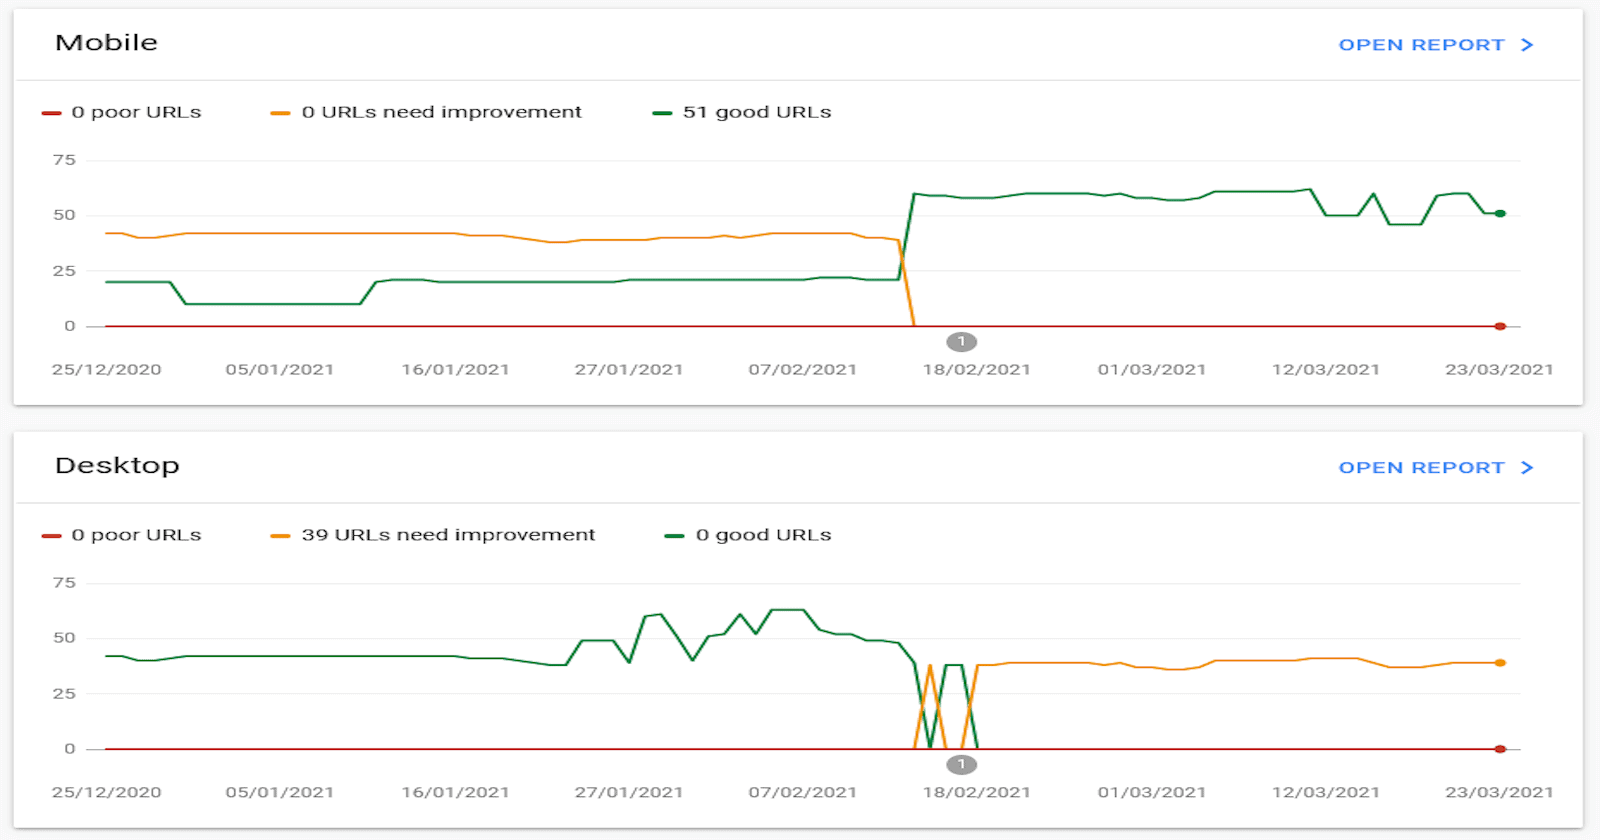
The core web vitals report assesses each of the vitals given above and classifies them as good, requires improvement, or poor.
This report will also be divided into Mobile and Desktop sections so you can identify and resolve platform-specific issues.
Which takes us to…
Mobile Usability Report
This part of Search Console is pretty straightforward: it tells you which pages on your website are mobile-friendly and which ones have errors, meaning they’re not mobile-friendly.
It’s really important, especially since mobile-first indexing is now in place.
When you’re fixing mobile rendering issues, it’s best to tackle them in the order they show up on the summary report page. This way, start with the broader issues like templates, then move on to the more specific ones.
After you’ve made the fixes, don’t forget to click “Validate and Update Google” to increase your ranking.
If you need more details on any errors, check out this Google site for additional information.
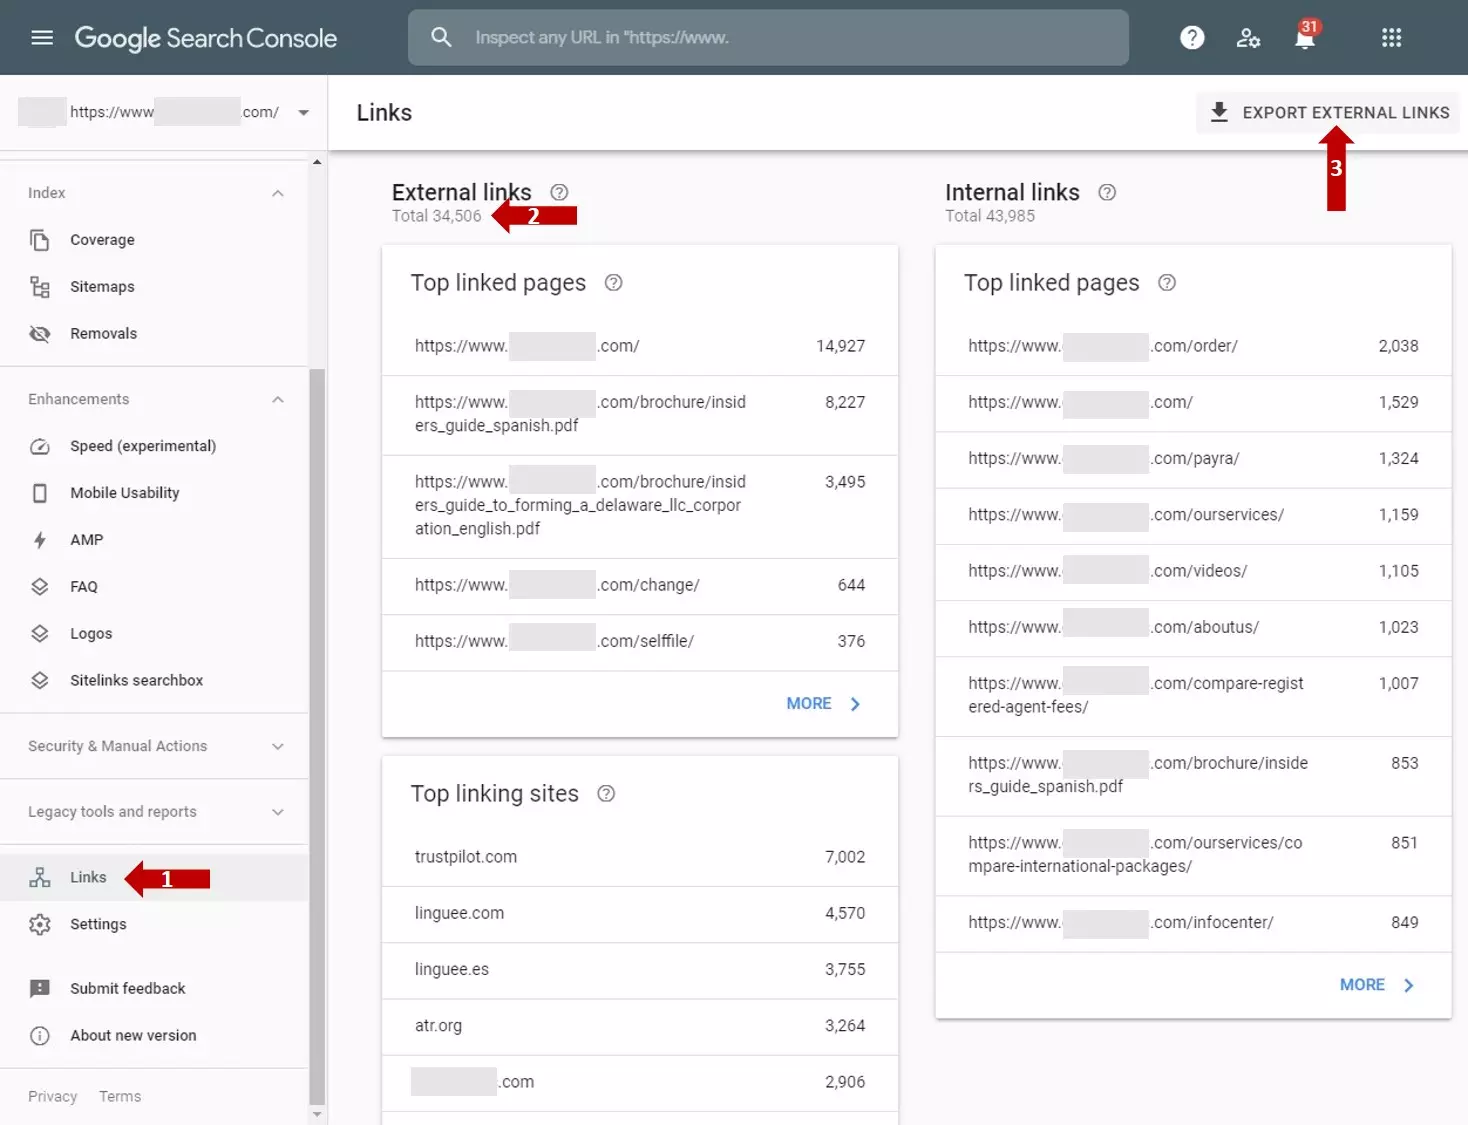
Links
This report will give you more insights into your top-linked sites and the domains that link to you. It also enriches the data you get from Google Analytics.
A particularly helpful feature is the “top linked text.” This feature tells you about the linking domain and the text hyperlinked to your page. It’s a great way to understand how others perceive the content you create.
Legacy Tools and Reports
If you’ve used Google Webmaster Tools for a while, you might see some changes to the old setup.
Some tools got moved to “Legacy Tools and Reports” by Google, so you can still use them.
- Crawl stats: If you’re new to Search Console, you might not need this. Crawl stats show how often Google checks your site and what it’s looking for. It’s handy for developers and SEO experts. But it’s smart to keep an eye on it to make sure Google isn’t visiting your site too often!
- Crawl Rate Settings: Use this to control how often Google checks your site. Handy if Google is visiting too much.
- Robots.txt Tester: Helps fix problems with blocked pages on your site.
- URL parameter tools: Good for sites with complicated URLs, like international shops. Might be tricky at first, but experts might still find it useful.
- International Targeting: Useful for sites with many languages. Helps make sure you’re reaching the right people in different countries.
You can use Google Search Console to fix things like schema markup and structured data errors.
Connecting Search Console to Google Analytics
To use Search Console data in Google Analytics, you need to allow data sharing in your GA settings.
Just go to admin, pick the property you want, then head to Search Console settings. Choose the data you want to see, and click save.
Remember, Search Console keeps data for up to 16 months, the longest time you can access it in GA. It usually takes about 48 hours for data to show up in both GA and Search Console.
Final Thoughts
Google Search Console is a must for website owners. It helps you understand how your site performs on Google and improves your SEO.
Start by signing up and verifying your website. Then, explore the tools and reports.
It’s easy to use once you get the hang of it. With practice, it can become part of your daily SEO routine.
Did this post help you learn how to use Google Search Console for better website rankings? Share your thoughts in the comments below!
Author: Jugnu Nagar
SEO Specialist